Smeg LF-453IT Manuel d'instructions
Naviguer en ligne ou télécharger Manuel d'instructions pour Lave-vaisselle Smeg LF-453IT. Smeg LF-453IT Instruction Manual Manuel d'utilisatio
- Page / 35
- Table des matières
- MARQUE LIVRES
Résumé du contenu
INSTRUCTION MANUALGGUUIIDDEEFFOORRUUSSIINNGGTTHHEEDDIISSHHWWAASSHHEERRAANNDDTTHHEEWWAASSHHIINNGGPPRROOGGRRAAMMSS
INSTRUCTION MANUALWWAARRNNIINNGGSSAANNDDRREECCOOMMMMEENNDDAATTIIOONNSS,,GGUUIIDDEEFFOORRTTHHEEUUSSEEOOFFBBAASSKKEETTSSAANNDDFFOORRCCLLEEAANNIINNGGDDII
Contents1. Safety and operating instructions __________________________282. Installation and hook-up _________________________________313. Operating
Safety instructions1. Safety and operating instructionsTHIS MANUAL FORMS AN INTEGRAL PART OF THE APPLIANCE: IT MUSTALWAYS BE KEPT INTACT TOGETHER W
Safety instructionsOBSOLETE APPLIANCES MUST BE RENDERED UNUSABLE. CUT OFF THEMAINS POWER CORD AFTER UNPLUGGING IT FROM THE WALL OUTLET,AND MAKE SAF
Safety instructionsLEANING OR SITTING ON THE DISHWASHER DOOR WHEN OPEN MAYCAUSE THE APPLIANCE TO OVERTURN, PUTING PEOPLE AT RISK.NEVER LEAVE THE DIS
Installation instructions2. Installation and hook-upRemove the polystyrene basket retainers.Position the appliance in the desired place of installat
Installation instructions2.1 Water supply connectionPreventing the risk of clogging or damage: if the water pipe is new orhas not been used for a lo
Installation instructions2.2 Electrical connection and precautionsCHECK THAT THE VOLTAGE AND THE FREQUENCY OF THE MAINS MATCHTHE RATINGS ON THE NAME
Installation instructionsWHEN CLEANING AND MAINTAINING THE APPLIANCE:BEFORE CARRYING OUT ANY WORK, ALWAYS UNPLUG THE APPLIANCEFROM THE ELECTRICAL SU
User instructions3. Operating instructionsOnce the dishwasher has been correctly installed, prepare for use asfollows:• Adjust the water softening
Contents1. Description of the controls_________________________________42. Troubleshooting ________________________________________9Thank you for cho
User instructions•Do not use table salt as it contains insoluble substances which,over time, may damage the water softening system.• When necessary,
User instructionsADDING THE RINSE AIDThe rinse aid helps the dishes dry faster andprevents the formation of scale deposits andstaining; it is automa
User instructionsADDING THE DETERGENTTo open the detergent dispenser cap, lightly pressthe button P. Add the detergent and close the capcarefully.Du
User instructions• The market offers liquid and powder detergents with differingchemical compositions, which may contain phosphates, or bephosphate-
User instructions3.3 General warnings and recommendationsBefore using the dishwasher for the first time, it is advisable to read thefollowing recomm
User instructionsItems which are not dishwasher-safe:•Wooden dishes, pots or pans: these may be damaged by thehigh washing temperatures.•Handcrafted
User instructions3.4 Using the basketsThe dishwasher has a capacity of 10 place-settings, including servingdishes.EN 50242 STANDARD LOADS FOR CERTIF
User instructionsLOADING THE LOWER BASKETCarefully load flat plates, soup plates, dessert and serving dishes,positioning them vertically. Pots, pans
User instructionsUPPER BASKETIt is recommended to load the upper basket with small- or medium-sizeditems such as glasses, small plates, tea or coffe
User instructionsADJUSTING THE UPPER BASKETThe upper basket can be adjusted in two positions, according to theuser’s needs and according to the heig
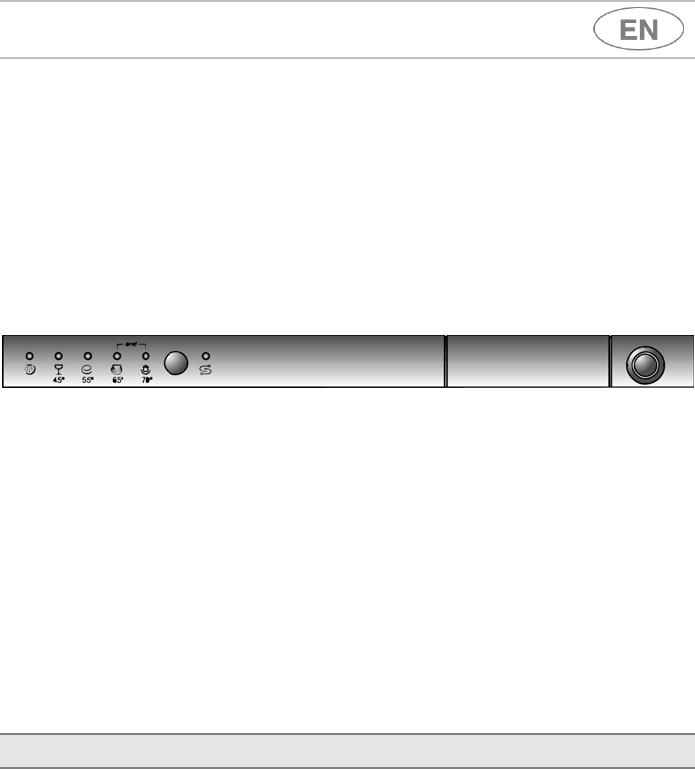
User instructions1. Description of the controls1.1 Upper panelAll the dishwasher controls are grouped on the upper panel.1ON/OFF BUTTONPressing this
User instructions4. Cleaning and maintenanceBefore carrying out any work, always disconnect the appliancefrom the electrical power supply.4.1 Gener
User instructionsCLEANING THE SPRAY ARM, TRAVELLING VERSIONTo remove the TRAVELLING spray arm, take hold of it and raise it torelease both the spray
User instructionsGENERAL WARNINGS AND RECOMMENDATIONS FOR CORRECTMAINTENANCE:• The filters should be cleaned under running water using a stiffbrush.
User instructionsIf the dishes are not being cleaned properly, check that:• the correct amount of detergent has been added;• there is regenerating s
User instructionsTECHNICAL DATAWidth447 ÷ 449 mmDepth measured flush with theouter edge of the control panelFree standing: 600 mmSemi-integrated: 59
195700050003/4”3/4”1/2”SW32MIN40cmCuø101 2 3 4 57 8 9 10 116128912ATTENZIONE: Quota:secondoimodelli820÷870oppure820÷890.Dependingonthemodel,distancema
User instructionsAfter using the table to identify the most appropriate washing program:• press the ON/OFF button (1) and wait for the PROGRAMINDICAT
User instructionsTABLE FOR CERTIFICATION BODIESReference standard EN 50242Reference program ECOLoad 10 place-settingsType of detergent BAmount of det
User instructionsCHANGING THE PROGRAMTo change the program in progress, simply open the door and select anew program. When the door is closed the dis
User instructionsADJUSTING THE WATER SOFTENING SYSTEMThe dishwasher is equipped with an device for the user to adjust thewater softening system accor
User instructions2. TroubleshootingThe dishwasher is capable of signalling a number of faults through thesimultaneous illumination of several indicat
User instructionsIf an alarm occurs the appliance interrupts the program in progress andsignals a fault.• Alarms E1, E3, E4 interrupt the current pr
Produits connexes et manuels pour Lave-vaisselle Smeg LF-453IT
 (27 pages)
 (3 pages)
© 2020, manymanuals.fr. Tous droits réservés | 1.276 s |
 Manymanuals.com
 Manymanuals.de
 Manymanuals.fr
 Manymanuals.it
 Manymanuals.pl
 Manymanuals.cz
 Manymanuals.es
 Manymanuals-pt.com
Commentaires sur ces manuels