Smeg STC700 Manuel d'instructions
Naviguer en ligne ou télécharger Manuel d'instructions pour Lave-vaisselle Smeg STC700. Smeg STC700 Instruction Manual Manuel d'utilisatio
- Page / 33
- Table des matières
- MARQUE LIVRES
Résumé du contenu
INSTRUCTION MANUAL GGUUIIDDEE FFOORR UUSSIINNGG TTHHEE DDIISSHHWWAASSHHEERR AANNDD TTHHEE WWAASSHHIINNGG PPRROOGGRRAAMMSS
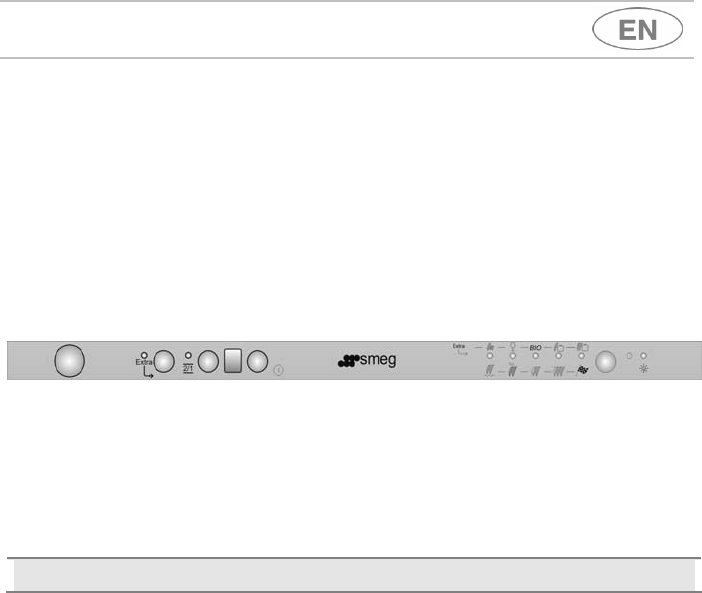
User instructions 9 3. Description of the controls 3.1 Upper panel All the dishwasher controls are grouped on the upper panel. Switc
User instructions 10 7 "2/1" OPTION BUTTON Press this button to activate the option for use of 2/1 products. 8 "2/1" OPTIO
User instructions 11 After using the table to identify the most appropriate washing program: • press the ON/OFF button (1) and wait for th
User instructions 12 PROGRAMME NR SYMBOL NAME TYPE OF DISHES AND DIRT PROGRAM DESCRIPTION CONSUMPTION WATER (LITRES) DETERGENT GRAMS 6 DIS
User instructions 13 The washing cycle will not take place if the dishwasher door is left open or not properly closed. 3.2 Washing program
User instructions 14 CHANGING THE PROGRAM To change the program in progress, simply open the door and select a new program. When the door is
User instructions 15 DELAYING THE PROGRAM (available in all programs except the soak program) The PROGRAM DELAY button (9) can be pressed
User instructions 16 ADJUSTING THE WATER SOFTENING SYSTEM N.B.: for the setting below to be possible, a washing program other than the
User instructions 17 If the door has to be opened while washing is in progress, the program will be interrupted. The relative light will
User instructions 18 4. Operating instructions Once the dishwasher has been correctly installed, prepare for use as follows: • Add th
Contents 1 1. Safety and operating instructions ___________________________2 2. Installation and hook-up___________________________________5 3.
User instructions 19 ADDING THE RINSE AID The rinse aid helps the dishes dry faster and prevents the formation of scale deposits and staining
User instructions 20 ADDING THE DETERGENT After adding the detergent, to close the lid slide it in the direction shown by the arrow as far as i
User instructions 21 • "2/1" Products If you wish to use detergents which already contain rinse aid, check whether your d
User instructions 22 WARNING! • Make sure that the dishes are securely in place so that they cannot tip over or obstruct the rotation o
User instructions 23 4.3 Using the baskets The dishwasher has a capacity of 7 place-settings, including serving dishes. CAUTION: do not
User instructions 24 The basket is fitted with plate racks which can be stowed horizontal if required. CUTLERY BASKET Cutlery must be
User instructions 25 5. Cleaning and maintenance Before carrying out any work, always disconnect the appliance from the electrical power sup
User instructions 26 To remove the top spray arm, take off the retainer ring-nut. Wash it in a jet of water and fit it into place correctly,
User instructions 27 GENERAL WARNINGS AND RECOMMENDATIONS FOR CORRECT MAINTENANCE: • The filters should be cleaned under running water us
User instructions 28 If the dishes do not come out clean, check that: • the correct amount of detergent has been added; • the dishes are
Safety instructions 2 1. Safety and operating instructions THIS MANUAL FORMS AN INTEGRAL PART OF THE APPLIANCE: IT MUST ALWAYS BE KEPT INTACT T
User instructions 29 6. Troubleshooting The dishwasher is capable of signalling a number of faults through the simultaneous illuminati
User instructions 30 If an alarm occurs the appliance interrupts the program in progress and signals a fault. • Alarms E3, E4 and E9 interr
898898896896894894051010151520202525303035354040454550505555MAXMAXMINMINSXSXDXDXSXSXDXDX555550508988988968968948940510101515202025253030353540404545
Safety instructions 3 THIS APPLIANCE IS MARKED ACCORDING TO THE EUROPEAN DIRECTIVE 2002/96/EC ON WASTE ELECTRICAL AND ELECTRONIC EQUIPMENT (WEEE)
Safety instructions 4 DO NOT DRINK THE WATER RESIDUES WHICH MAY BE PRESENT INSIDE THE DISHES OR DISHWASHER AT THE END OF THE WASHING PROGRAM AND
Installation instructions 5 2. Installation and hook-up Remove the polystyrene basket retainers. Position the appliance in the desired
Installation instructions 6 2.1 Water supply connection Preventing the risk of clogging or damage: if the water pipe is new or has not been
Installation instructions 7 IF THE APPLIANCE IS PROVIDED WITH A PLUGLESS SUPPLY CORD: IT IS NECESSARY TO INSTALL IN THE FIXED WIRING AN ALL-
Installation instructions 8 FOR UK ONLY: THIS APPLIANCE MUST BE EARTHED. Fuse replacement If the mains lead of this appliance is fitted w
Produits connexes et manuels pour Lave-vaisselle Smeg STC700
 (31 pages)
© 2020, manymanuals.fr. Tous droits réservés | 0.447 s |
 Manymanuals.com
 Manymanuals.de
 Manymanuals.fr
 Manymanuals.it
 Manymanuals.pl
 Manymanuals.cz
 Manymanuals.es
 Manymanuals-pt.com
Commentaires sur ces manuels